


Things That Go Bump on the Foot (Episode 4)
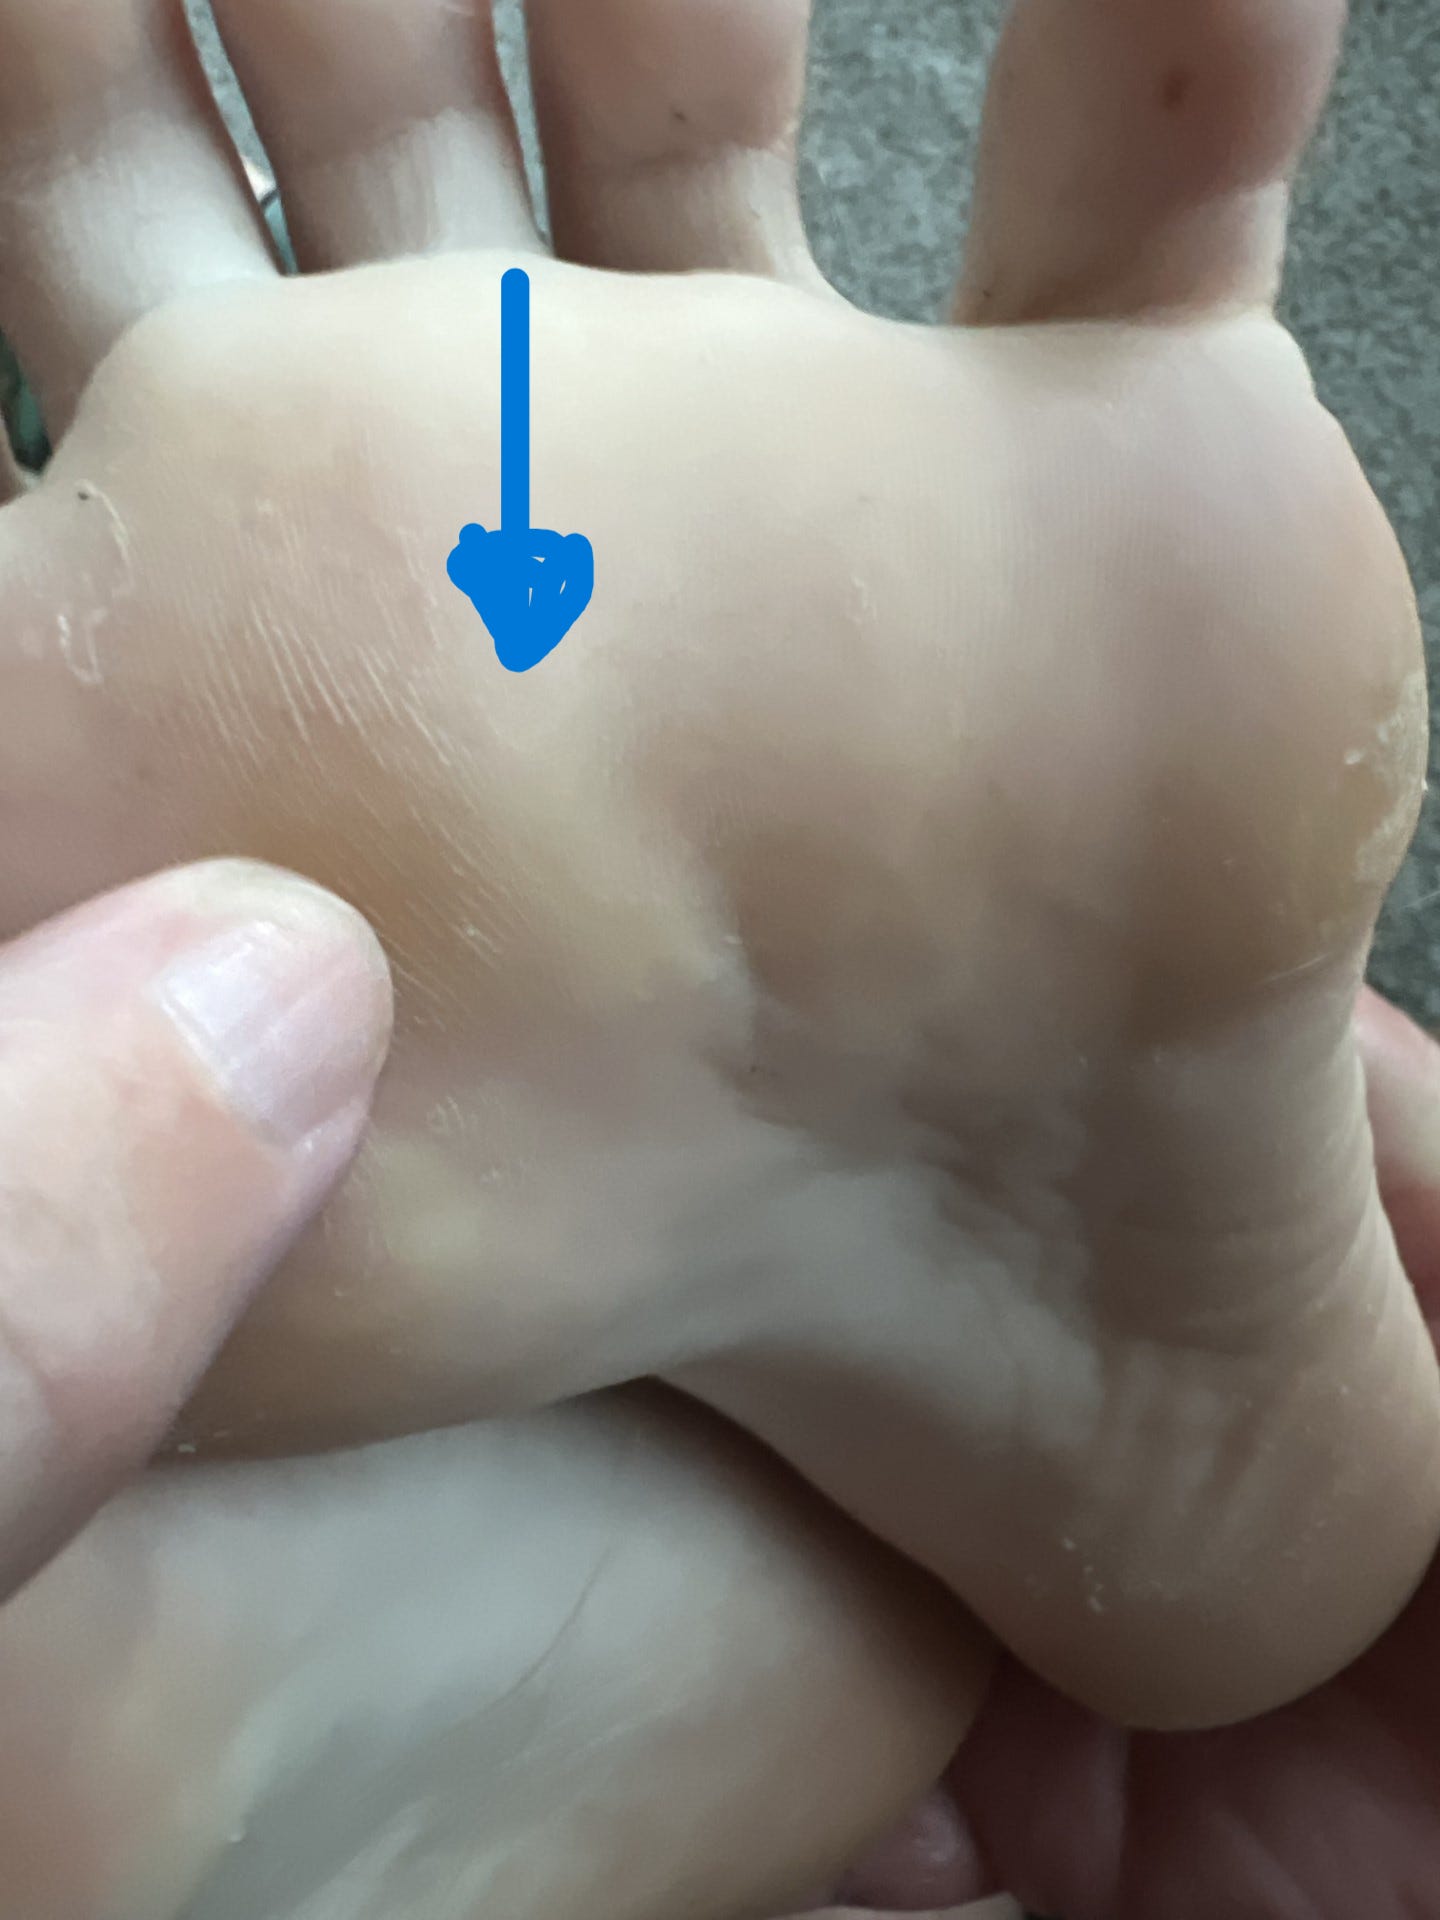
Shandee's knot or bump on the ball of her foot
This episode goes out to subscriber Melanie and her sweet daughter Shandee. They messaged me with a picture of Shandee’s foot and wanted to know what was causing this painful bump.
Shandee is in her mid-20s and has no underlying medical conditions. She is not diabetic. She likes to wear loafers or Doc Marten boots, but not tennis or athletic shoes. She doesn’t spend a lot of money on her shoes.
Her pain began about 8 months ago. At that time, she was working 10-12 hour shifts, five days per week, mostly on her feet. The bump showed up about 2 months ago (after the pain started). Her pain got WORSE when she moved into a house having hardwood floors and no carpet. It does not hurt constantly but hurts with pressure. If she is on her feet more than usual (she now works part time), she gets a constant, dull achiness in the bump.
I visited with Shandee in her living room, turned a light on her feet, and got to work examining her feet. Figuring out her normal anatomy allowed me to offer some conservative treatment suggestions to calm her pain.
Click HERE to see a video of the examination.
AFTER watching the video, please read the explanation below. In this case, the video is much easier to understand than the writing.
Here is what I found in some written detail.
Forefoot Varus: Shandee has a specific foot type (a normal variant) called forefoot varus. This means that when you look at her foot straight on, her toes have a tilt up toward the midline of her body. Very often, this foot type causes bumps or knots on the sides of her foot, issues with calluses, and the formation of bunions. It causes the side of the foot to strike the ground very hard with walking and can cause pain and callus. This pinky toe side of the foot always strikes the ground first, but having it angled naturally towards the ground makes it strike even harder.
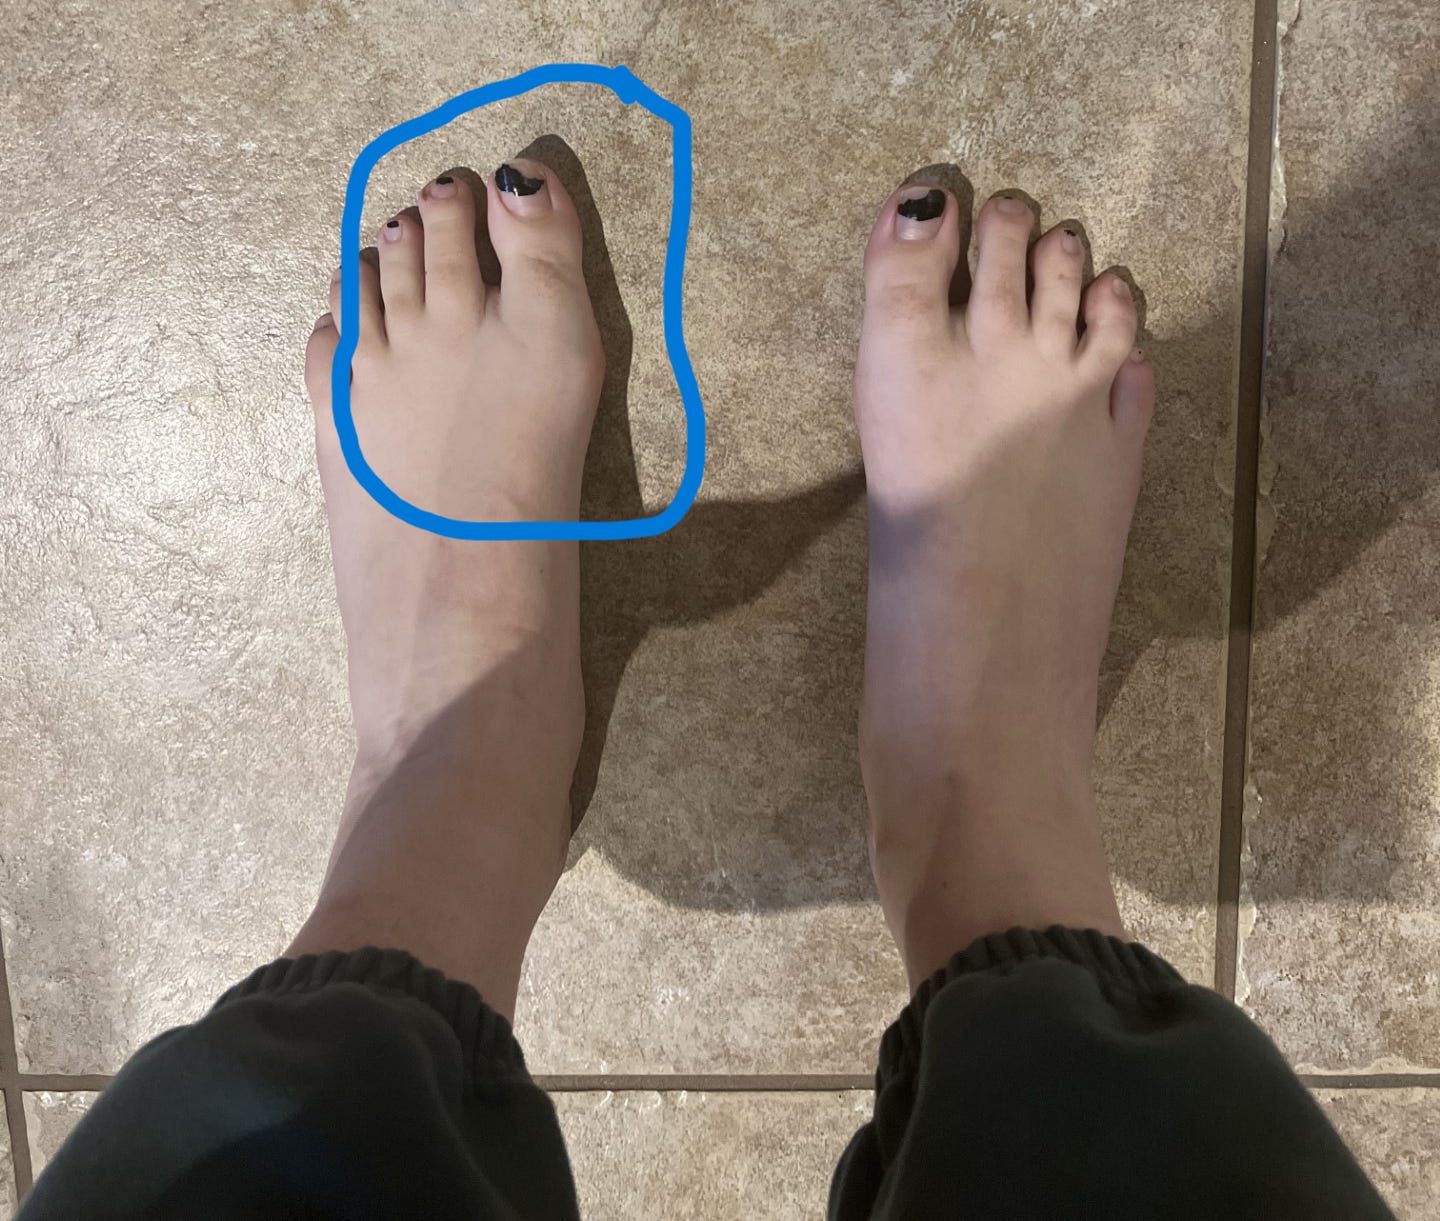
Leg Length Discrepancy: One of Shandee’s legs appeared to be longer than the other. I was able to detect this by having her sit straight back in her chair, putting my finger over both of her ankle bones, and comparing them. I found that her left leg was about 1/2 inch longer than her right. What we find in a longer leg is a higher chance of having a bunion (misaligned big toe joint). You can see the bunion on her longer left leg in this picture:

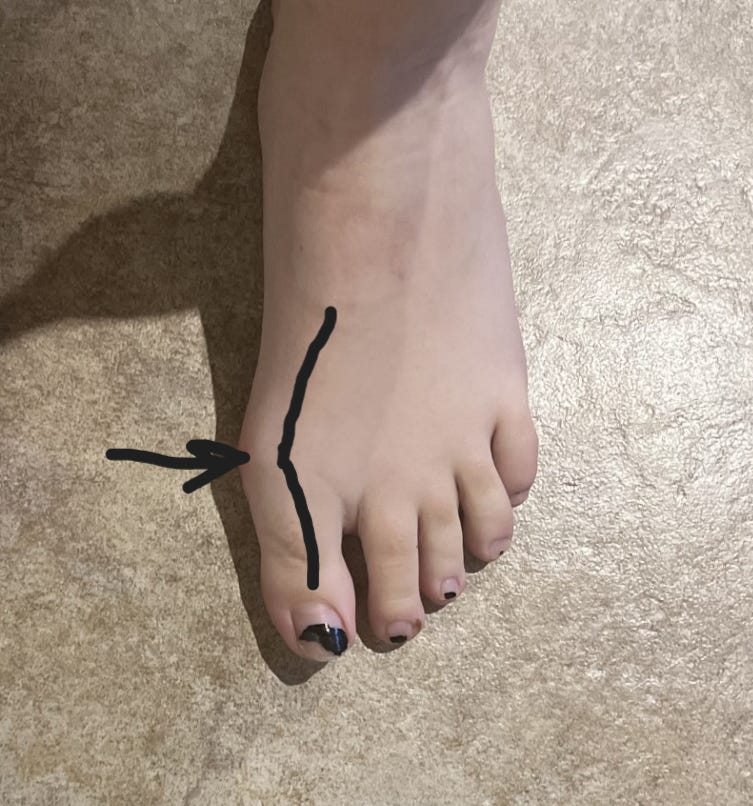
Bunions: Bunions are also known in medical lingo as Hallux Valgus (this means angled big toe). Angled big toe describes what is happening.

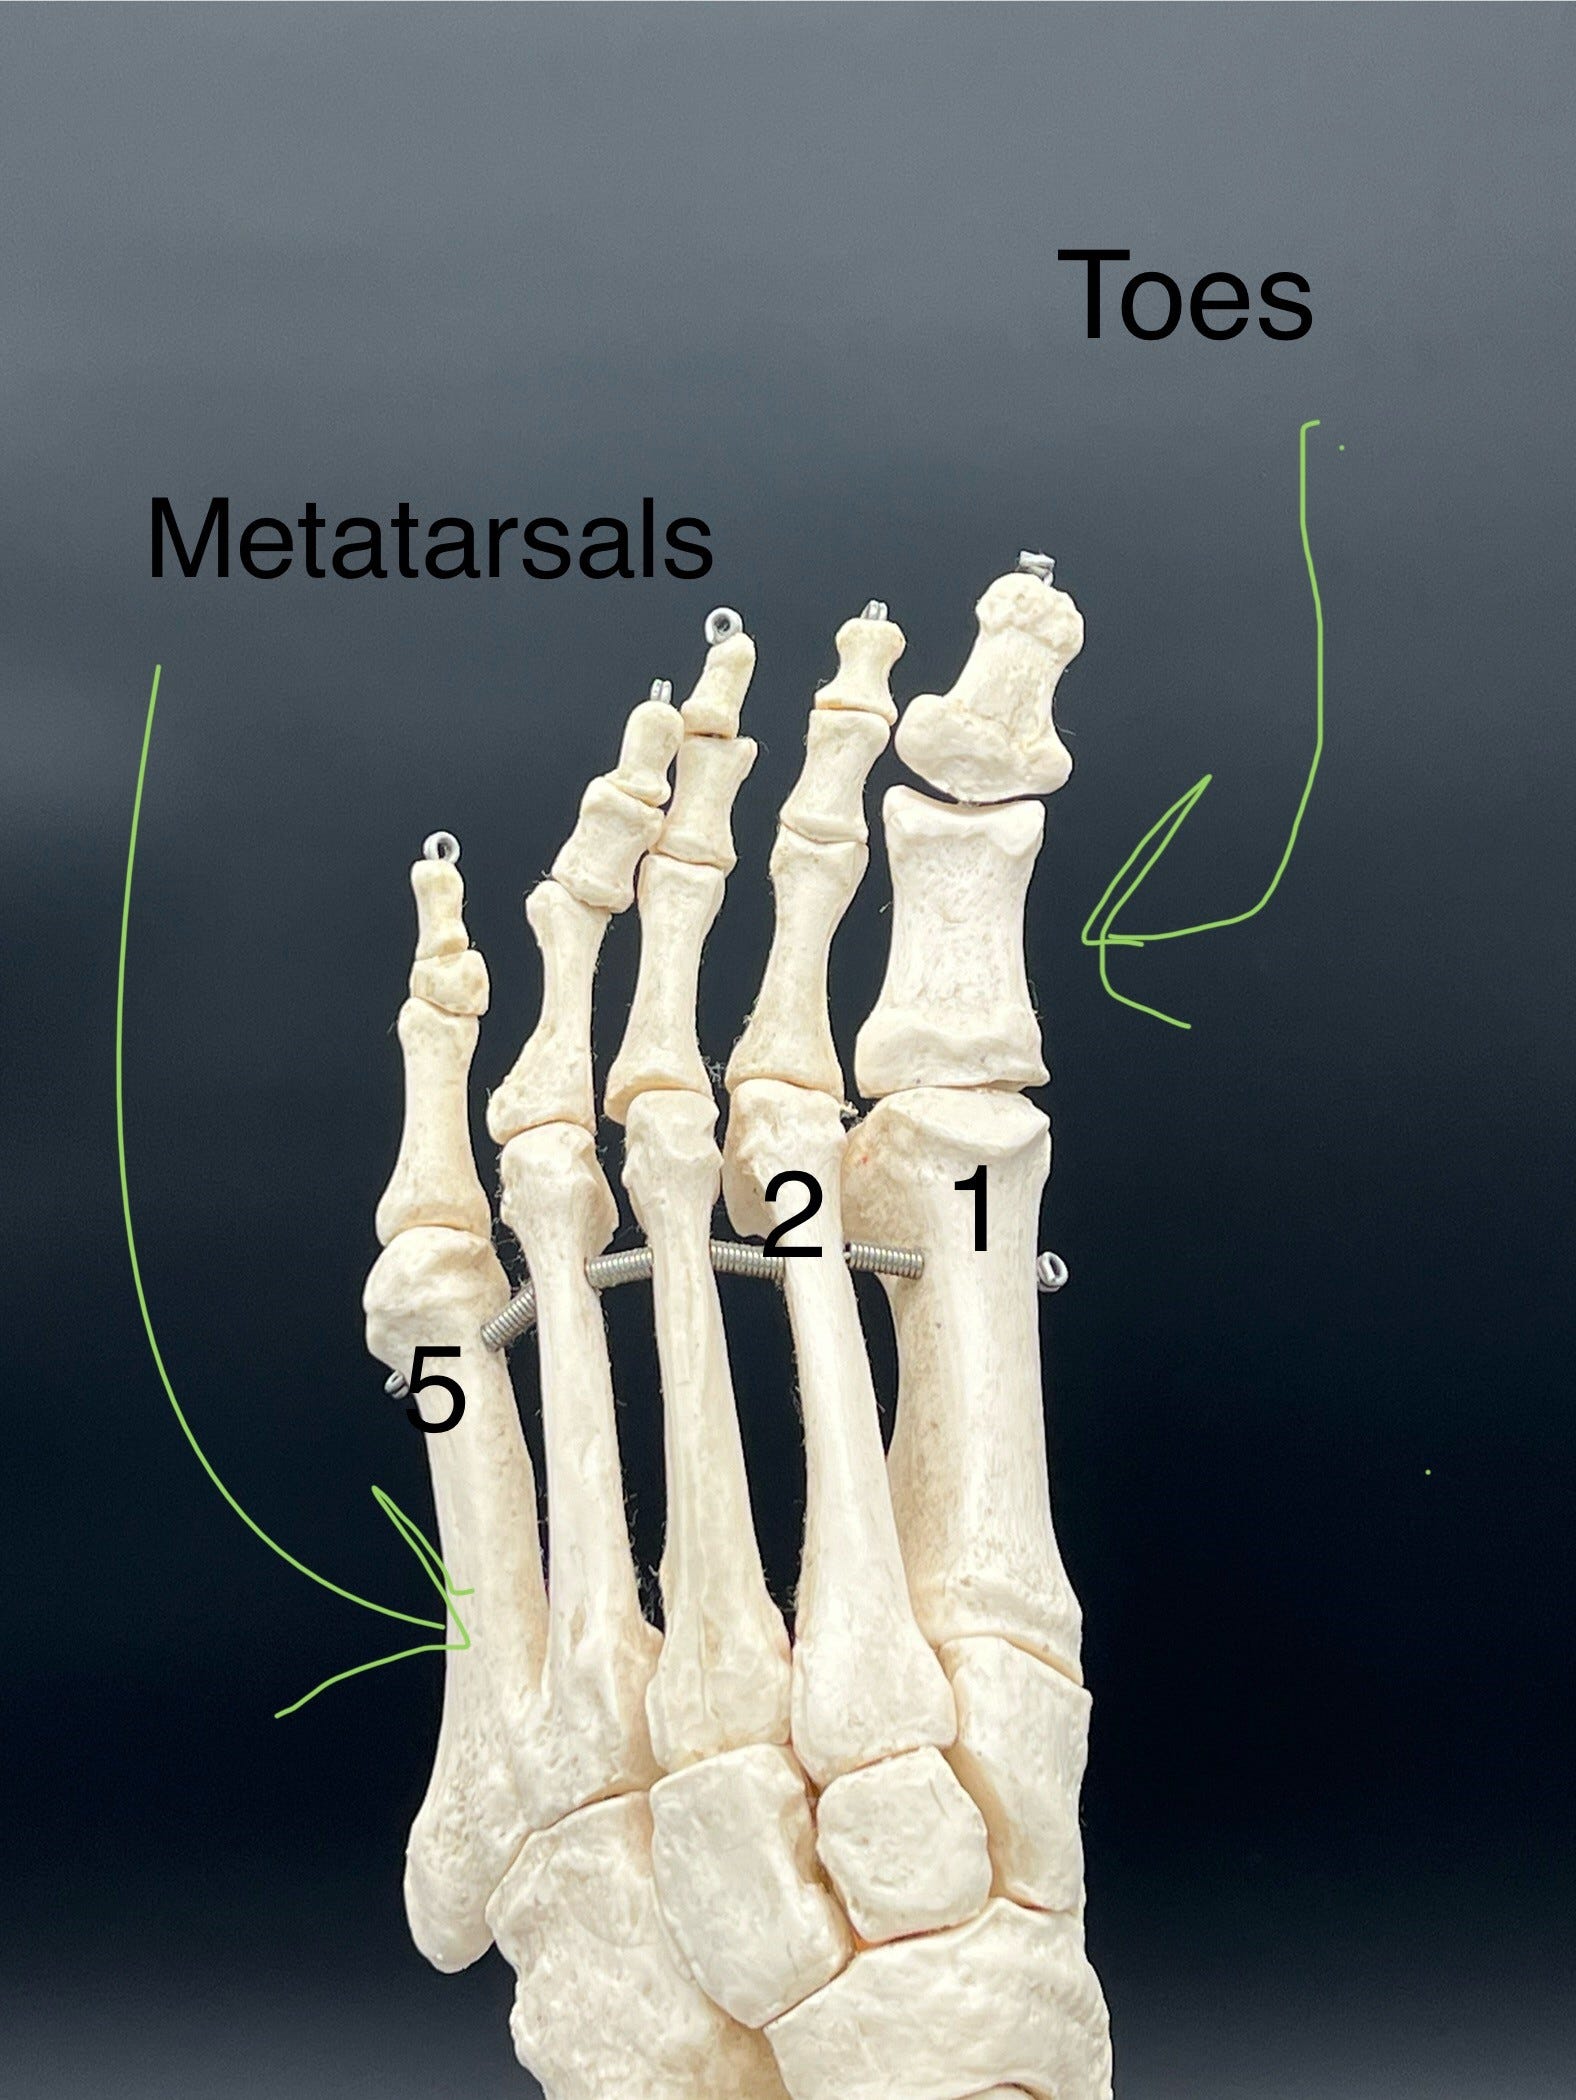
To be able to understand my explanations below, please refer to the following diagram to see where TOES versus METATARSAL BONES are.

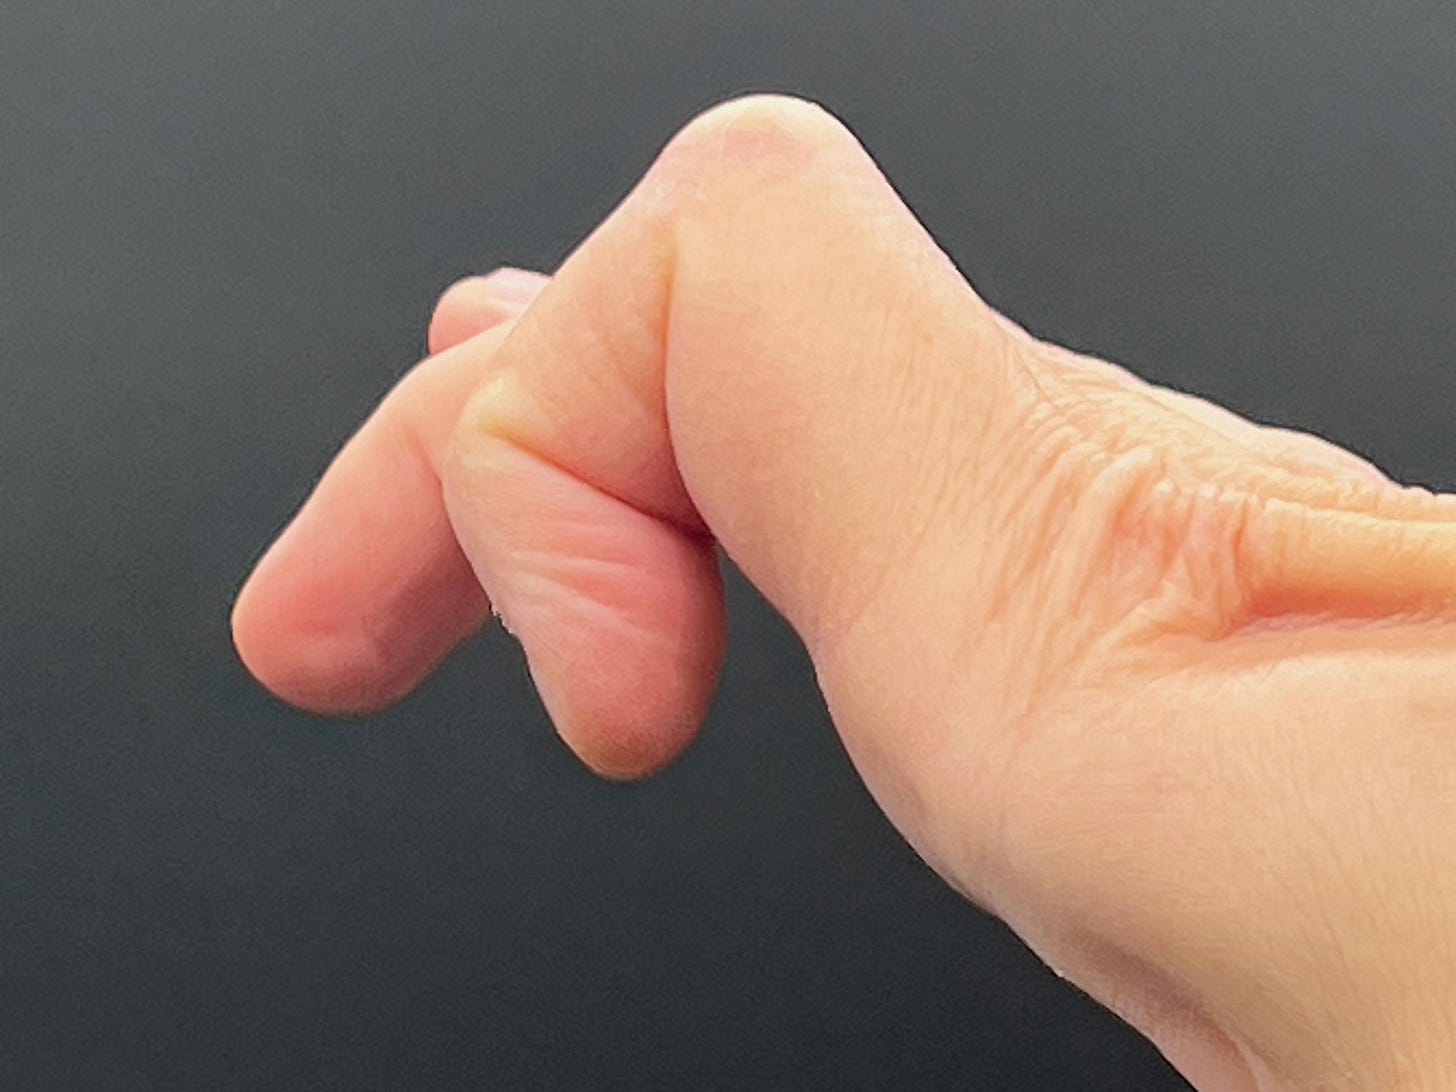
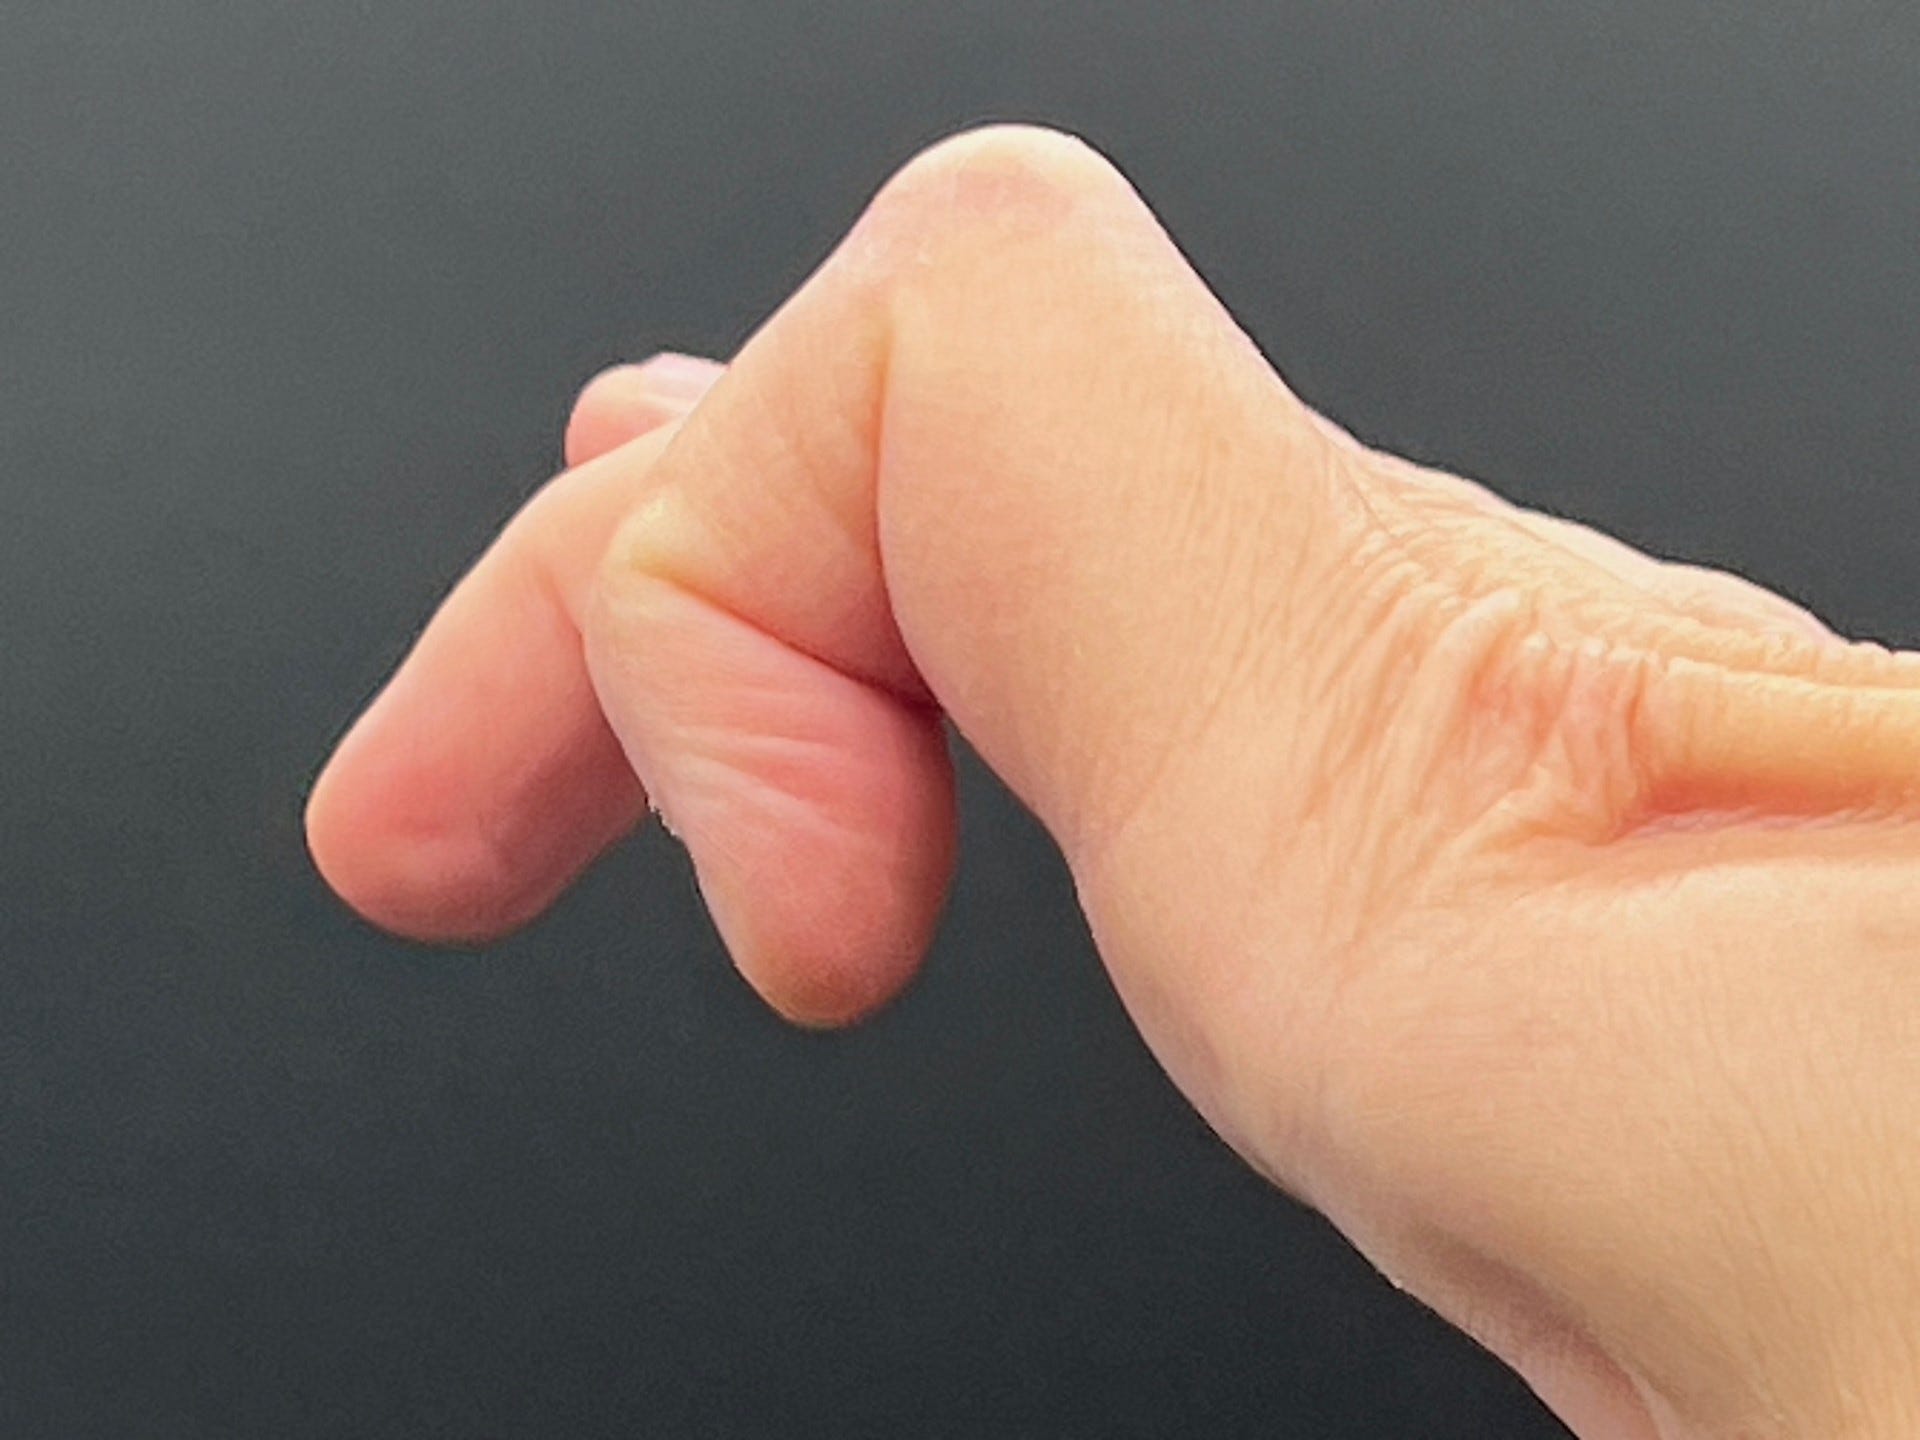
In a bunion, the 1st metatarsal bone starts heading toward the center of your body, which pushes the big toe away from the center of your body. This can cause the 2nd toe to cock up (called a hammer toe) and push the end of the 2nd metatarsal down into the ground. This was ultimately a significant cause of Shandee’s bump and her joint pain. Her bump is the 2nd metatarsal head sticking down. Here is a poor attempt to create the bump with my finger. Try it on your own and you can see how a cocked up toe causes the bone in the palm of your hand to stick down.
Sharp Metatarsal angle: The length of Shandee’s individual metatarsal bones in relationship to each other causes a problem. Her 2nd metatarsal bone (bone connected to her second toe) was longer than her other metatarsal bones by an undesirable amount. This is a normal variant, but it causes the 2nd metatarsal bone to drive into the ground with more pressure when walking. Ideally, these bones should spread pressure evenly across the ball of her foot when her heel comes off the ground. If one bone bears all the weight, it can cause a bump, callus, and pain.
FLOORING AND SHOES: Shandee’s experiences with concrete or hard wood floors were clearly a stress on her feet.
A word on X-rays. I would also recommend Shandee have a weight bearing x-ray performed of her foot. Since she had grinding of her 2nd toe joint on the exam, I would want to look at the round end of the metatarsal bone to see if any of the bone has become chipped or flattened, and to confirm the impression I had that the angle the heads of her bones made was very SHARP or highly ANGLED.
TREATMENT: Treating the causes, not just symptoms.
Watch the videos of her treatment plan HERE and also HERE.
Leg Length Discrepancy: To determine appropriate treatment for unequal leg length, I recommended Shandee start with:
A chiropractic adjustment to see if the leg length issue is treatable. A rotated hip/pelvis can cause correctable leg length differences. If the issue persists despite chiropractic treatment, I recommend using a heel lift in the shoe. The heel lift is placed in the shoe of her shorter leg. Stand in front of a mirror with your hands on your hips to evaluate how much lift you need. The hip or belt on the taller leg will look higher in the mirror. Stop adding lift when your hips or belt is level. You can get as little as 1/8 inch and as much as 3/16 to ½ inch lift in some shoes without causing problems. The rule of thumb is that lifts of 3/4 inch or more need to be added to the sole of the shoe. A pedorthist (foot insole and shoe modification medical specialist) or your local cobbler can help with this. Some insurance companies pay for these services under their DME (durable medical equipment) portions of their policies. DME usually includes things like CPAP machines, oxygen tanks, walkers, wheelchairs, canes, crutches, etc. So check your insurance policies to see if your insurance will pay for a lift to be added to the sole of your shoe. Check out my website page for links to over-the-counter heel lifts (the inside the shoe kind). Here is the shopping link: Shop Foot Products
Check your lifts for wear as they flatten with use. Wear your lift whenever you can to reduce the damage being done to your longer leg. Failing to treat leg length differences can contribute to scoliosis, back pain, and foot deformities.
Morton’s Extension: This is a simple strip of adhesive felt or foam to correct the way the foot touches the ground when her heel is lifted. This will share pressure between the pad and the end of her 2nd metatarsal, relieving some pain.
Dancer’s pad—applied with the opening over her bump. I chose this pad to try due to her forefoot varus. I wanted to reduce pressure on the 5th metatarsal (pinky toe side) of the foot by lifting the end of that bone off the ground when she stands. I am letting Shandee try the Morton’s Extension AND the Dancer’s pad in different shoes to see which helps her pain the most. Her own experiences will guide treatment.
Regarding the Bunion: Treating the unequal leg length should slow the formation of her bunion. Since her bunion does not hurt at this time, or cause rubbing on her second toe, we do not need to treat it at this time. Also, as I noted in the video, if she has surgery on her non painful bunion, this could potentially cause more problems for her painful second toe joint because most bunion surgeries shorten the bone further. Unless a surgery WITH a bone lengthening was performed, she would likely have WORSE pain in the 2nd toe joint after surgery. This is one reason I highly recommend avoiding foot surgery unless your pain DOES NOT RESPOND TO CONSERVATIVE CARE. Also, with rare exceptions, DO NOT HAVE ORTHOPEDIC FOOT SURGERY IF YOU DO NOT HAVE PAIN.
Shoe Choices: I recommend maximum cushions shoes such as Hoka Bondi or Skechers Max Cushion at work, and a thickly soled house shoe at home due to her hard wood floors. Hard wood, tile, and concrete are common flooring types which can cause foot pain. Her cheap shoes were not doing her favors. She would resolve a lot of her issues with better shoe choices.
Callus Care: I have a link to her callus care treatment HERE. Deep or thick calluses should be shaved off by your podiatrist using a medical grade, sterile scalpel. Do NOT use your pocket knife at home (Men-you know who you are). Calluses that start to return or are THIN can respond to periodic callus care. Soak your feet in lukewarm water (Not Hot—it’s a burn risk) until the callus is crumbly. Then use a pumice stone or ped egg to sand off callus until you reach supple skin. Be careful not to overdo it and create a wound. Check your skin suppleness as you sand/file, and check for signs of redness in the skin to make sure you aren’t filing too deep. Stop if it hurts. As always, ask your local podiatrist if callus self care is safe for you. Diabetics can cause harm if they have lost sensation in their feet.
A FINAL NOTE: I think of conservative treatment this way—it is much easier, cost effective, and healthier for your body to have surgery on your shoes than your feet.
As always, I am not your doctor and have not examined YOU. Please see your local podiatrist for a full workup of YOUR feet. This advice is intended to help you understand your podiatry visit, not to replace it.
If you would like to ask me a specific question and have a substack post dedicated to your foot issue, please graciously consider a paid prescription. And don’t forget to head on over to my website Practical Podiatry for access to my Amazon Shop to see how you can purchase some of the things I used in these videos. If you use my links, I will get a small commission which helps me provide this service. All images and videos are copyrighted by Practical Podiatry. Please do not use without permission. Thank you so much!